Orinj version 7.0.0
A loop in Orinj is a collection of tracks. These tracks contain short wave, Downloadable Sounds (DLS), or SoundFont (SF2) samples and buttons that tell Orinj when to play these samples. The tracks also contain volume, pan, and other settings.
A loop is not very different from a recording session. However, rather than recording audio data and mixing it into a song as you would normally do in a recording session, you can use the loops to arrange existing audio files. The loops can be short drum pieces, guitar licks, or other. Loops helps if you do not own a set of real drums or a guitar or do not know how to play these instruments.
If, for example, you want to build a standard alternating kick and snare drum loop, you will:
- Set a 4/4 loop;
- Add an existing kick drum wave file to the first track;
- Add two kick beats (hits) to that same track on the 1 and 3 of the rhythm;
- Add an existing snare hit wave file to the second track;
- Add two snare beats to that second track on the 2 and 4 of the rhythm;
- Perhaps, add a high hat or other cymbals; and
- Mix this loop into a single wave file that you can then import and loop into your multitrack session.
Loops are displayed and controlled by the Orinj loop building view.
See also Orinj Working with loop tracks and Orinj Working with loop hits.
Create a new loop
To create a new loop, click on File and then on New in the Orinj menu. The current loop, if there is one, will be closed and a new loop will be ready for use. You may be asked to save the current loop, before it is closed.
Save a loop
To save a loop in a file, click on File and then on Save in the Orinj menu. You may be prompted to give a name to the loop.
If you want to save the loop under a name that is different than its current name, click on File and then on Save As in the Orinj menu.
Open an existing loop
To open a loop, click on File and then on Open in the Orinj menu. You will be prompted to browse to your loop. Find the loop file and open it. All loop files have the extension "klp". This extension may be visible, depending on the settings of your computer.
If the loop that you want to open was used recently, it will be listed under File and then Recent in the Orinj menu. You can click on the corresponding menu command to open that file.
Several ready loops are included in the Orinj installation. These loops reside in the "../loops/" folder of your Orinj installation. These loops are examples for various music styles.
Close the current loop
To close the current loop, click on File and then on Close in the Orinj menu. You may be prompted to save the loop first.
Switch to another loop
To display another one of the open loops, click on Loop and then on Select in the menu. In the dialog, choose one of the loops and click OK.
Choose an output device
During playback, Orinj sends all sound to one output device (soundcard). To choose the output device, to which sound data will be sent during playback, click on Loop and then on Output Device in the Orinj menu. You will see the following dialog.
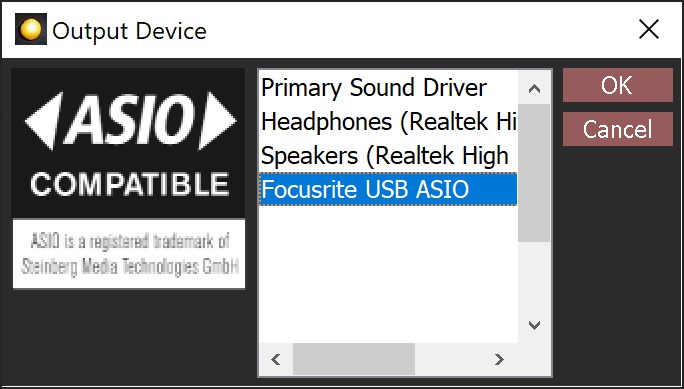
This dialog lists all available output devices. The "primary sound driver" device is usually the default sound device chosen through your operating system. Select a device in the dialog and click OK.
Set the tempo / time signature
To set the tempo and time signature of your loop, click on Loop and then on Tempo / Time Signature in the Orinj menu. You will see the following dialog.
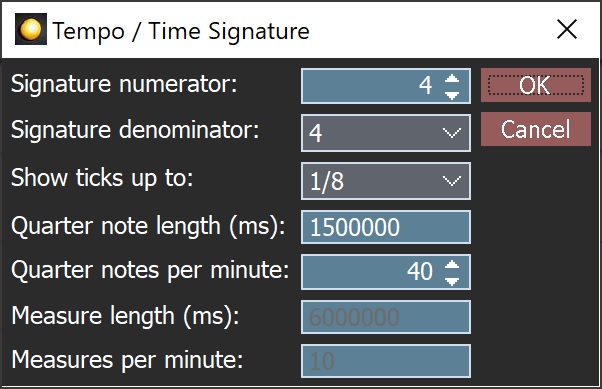
Use this dialog to determine the tempo and time signature of the loop. Unlike in the multitrack session, the time signature of the loop is important. Each track in the loop building view has notches that are determined by the time signature. In 4/4 rhythm, for example, each track will have 16 notches for each of the 16 quarter notes in the beat. As you add drum hits to a track, you can snap these hits to the track notches, which ensures that the hits will be exactly on beat.
See also Orinj Working with sessions for further detail on the Tempo / Time Signature dialog.
Play, stop playback, pause
To play your loop, click on the play button ( ) in the player toolbar at the bottom of Orinj, or click on Loop and then on Play in the Orinj menu. To play the loop indefinitely, click on the play loop button (
 ) in the player toolbar at the bottom of Orinj, or click on Loop and then on Play Loop in the Orinj menu.
To stop playback, click on the stop button ( ) in the player toolbar at the bottom of Orinj, or click on Loop and the on Stop in the Orinj menu. Subsequent playback will start from the beginning.
To pause playback, click on the pause button ( ) in the player toolbar at the bottom of Orinj, or click on Loop and then on Pause in the Orinj menu. You can then either resume playback or you can stop it.
Fast forwarding, rewinding, and recording are not available in the loop building view.
Mix
To mix your loop to a wave file, click on Loop and then on Mix in the Orinj menu. You will get the Loop Mix Properties dialog shown in the picture below.
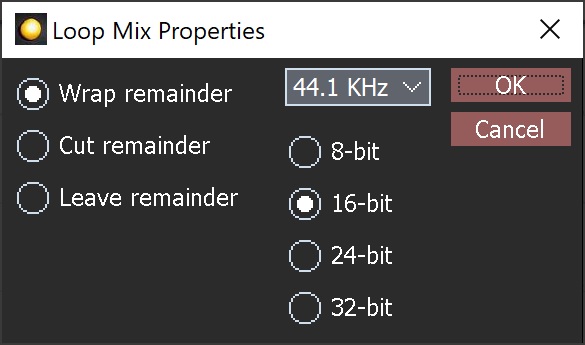
Use this dialog to specify the sample rate and sampling resolution of the mix. If, for example, you are creating a drum loop for a 16 bit, 44.1 KHz session, you would want to mix the loop to a 16 bit, 44.1 KHz wave file.
Use the dialog also to specify how the remainder of the loop should be handled in the mix. The remainder is the sound data that extends beyond the length of the loop. Suppose for example that you are creating a 4 sec loop that ends with an open high hat. The sound of the open high hat will probably extend beyond 4 seconds. What you will do with this extended loop depends on how you want to use the loop. If the loop is something that will be played over and over in your song, you will probably want to wrap the remainder. The end of the high hat will then sound over the beginning of the loop (it will be wrapped around). If you then insert the resulting wave file in your song and loop it over and over again, the high hat will sound natural. If this loop is something that will be played only once (a drum fill maybe), you can leave the remainder and create a loop that is longer than 4 sec and incorporates all sound data from the high hat.
How you handle the loop remainder can be specified both here and in the menu. If you choose something different here than what is in the menu, the value here will be used and the value in the menu will be ignored.
Click OK in the dialog to mix the loop. Orinj will create a wave file and switch to the single wave view, where this wave will be displayed.
The wave samples in the Orinj installation use the 16-bit and 44.1 KHz sampling resolution and sampling rate (DLS and SF2 samples may have different sampling rates and resolutions). Orinj will first mix to these sampling resolution and rate and will then convert the mix to the desired sampling resolution and rate. Also, wave samples are mono waves but are always converted to stereo waves during playback and mixing.
Split a loop
Loops are usually designed so that they can be inserted into a session. Loops can be split, so that each track with an instrument in the loop is placed in a separate loop. Then, when these separate loops are inserted into the session, they can be placed in separate session tracks, which helps mixing.
To split the loop into separate loops for each non-empty loop track, click on Loop and then on Split in the menu. The new loops will be placed in the same folder as the original loop. The new loops will have titles that combine the title of the original loop and the title of the corresponding instrument.
Insert a loop in the session
You can insert a loop file directly in the session (you do not have to mix it to a wave file). See Orinj Working with session blocks.
Add new comment