Orinj version 7.0.0
MIDI allows you to create tracks with instruments that you do not have or cannot play.
MIDI files can be inserted into the multitrack session. In the session, they are temporarily converted to wave files and are used in the same way as all other session sound blocks. The underlying MIDI file though can still be edited in the MIDI roll view and any changes to it will be shown in the session.
Create a new MIDI file
To create a new MIDI file, click on File and then on New in the Orinj menu.
Open an existing MIDI file
To open a MIDI file, click on File and then on Open in the Orinj menu.
Click on File and then on Recent to see the names of MIDI files used recently. Click on one of these files to open it.
Save the current MIDI file
To save the MIDI file that you are working with, click on File and then on Save in the Orinj menu. If you want to save the current MIDI file under a different name, click on File and then on Save As in the Orinj menu.
Close the current MIDI file
To close the current MIDI file, click on File and then on Close in the Orinj menu. You may be prompted to save the file if it was never saved before.
Play, stop playback, pause, fast forward, rewind
To play your MIDI file, click on the play button ( ) in the player toolbar at the bottom of Orinj, or click on Sequencer and then on Play in the Orinj menu. To play only what is visible on the screen, click on the play screen button (
 ) in the player toolbar at the bottom of Orinj, or click on Sequencer and then on Play Screen in the Orinj menu. Once the play cursor (the yellow vertical line) reaches the end of what is visible on screen, playback will stop. To play a portion of your MIDI file in a loop, select that portion and then click on the play loop button (
 ) in the player toolbar at the bottom of Orinj, or click on Sequencer and then on Play Loop in the Orinj menu. To make a selection over the MIDI file, first click on the select mouse pointer (
 ) in the pointer toolbar at the bottom of Orinj, then click on the MIDI file on screen, and then drag the mouse to the left or the right.
To stop the playback of the MIDI file, click on the stop button ( ) in the player toolbar at the bottom of Orinj, or click on Sequencer and the on Stop in the Orinj menu. The play cursor will return to where playback started.
To pause playback, click on the pause button ( ) in the player toolbar at the bottom of Orinj or click on Sequencer and then on Pause in the Orinj menu. After you pause playback, you can either resume playback or you can stop it.
To fast forward, click on the fast forward button ( ) in the player toolbar at the bottom of Orinj. You can fast forward only during playback. When you release the fast forward button, playback will resume. To rewind playback, click on the rewind button (
 ) in the player toolbar at the bottom of Orinj. You can similarly rewind only during playback and playback will resume when you release the rewind button.
If you want to fast forward to the end of the MIDI file, click on the fast forward to end button ( ) or click on Sequencer and then on Fast Forward To End in the Orinj menu. To rewind to the start of the MIDI file, click on the rewind to start button (
 ) or click on Sequencer and then on Rewind To Start in the Orinj menu. You can fast forward to the end or rewind to the start both during playback and otherwise.
Set the tempo of the MIDI file
To change the tempo of your MIDI file, add a tempo control to the file. First, switch the MIDI control line at the top of Orinj to show the MIDI tempo controls. Then click on Event and then on Add Control. Alternatively, click on the draw mouse cursor ( ) in the pointer toolbar at the bottom of Orinj and then click on the MIDI control line at the place where you want to add the tempo control. You will see the following dialog.
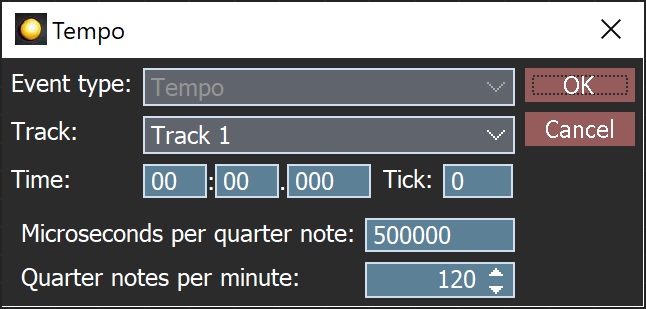
Use the dialog to specify the tempo in microseconds per quarter note or in quarter notes per minute. Specify also when the tempo control will be used (see MIDI Set Tempo meta message). The tempo control will not affect the tempo of preceding messages and will only determine the tempo for subsequent messages until another tempo control is reached.
This tempo is the tempo of the MIDI file. The tempo and time signature settings of the grid and the time signature line are independent of the tempo of the MIDI file and not necessarily consistent with it. You can make the two consistent, but you have to do that separately. To set the tempo and time signature of the grid and the time signature line, click on Sequencer and then on Tempo / Time Signature in the Orinj menu.
Set the tempo and time signature of the MIDI roll view
To set the tempo and time signature of the MIDI roll view (i.e., grid, time signature line), click on Sequencer and then on Tempo / Time Signature in the Orinj menu. As described above, this will not change the tempo and time signature of the MIDI file itself, but only of the MIDI grid and of the time signature line. See Orinj Working with sessions for more information on the tempo and time signature controls employed in Orinj.
Work with MIDI channels
See Orinj MIDI channel control panel.
Work with MIDI tracks
See Orinj MIDI track control panel.
Convert the MIDI file to a wave file
First, make sure you have specified a Downloadable Sounds (DLS) file or a SoundFont (SF2) file in your preferences. These files contain wave samples for each MIDI instrument and note and other information that describes how samples should be used as MIDI notes. Click on Preferences and then on Synthesizer Base in the Orinj menu to do so. See Orinj Preferences for more information.
To convert a MIDI file to a wave file, click on Sequencer and then on Convert To Wave in the Orinj menu.
When a MIDI note is converted to wave samples, a MIDI note off message is the message that tells Orinj when the playback of a MIDI note should begin to decay to silence. If the MIDI note off message is at the exact same time as the beginning of the next note (a MIDI note on message), the decaying note may overlap with the next note and both may be heard for a short time. This depends on the DLS or SF2 file, as these files specify how long the decay should be. If you want to remove the overlap, you should move the note off message slightly earlier in time, so that the first note can decay fully before the next note starts.
Record the MIDI file to a wave file
Converting a MIDI file to a wave file has the advantage that you can choose which DLS or SF2 file is used during the conversion. You do, however, need to specify a DLS or SF2 file. If you do not have one, you can record the MIDI file to a wave file. Then, however, you cannot choose a sound font and you will be relying on the sound font used by your system.
In Orinj, you can record a MIDI file to a wave file by playing the MIDI file and recording the playback. The steps to do so are as follows.
- Select the MIDI playback device. Orinj cannot change the MIDI playback device, but uses the main MIDI playback device used by the operating system (in Windows, for example, you would change that device by using the Sound control panel).
- Specify the input device for wave recording. Click on Sequencer, then on Record To Wave, and then on Input Device in the Orinj menu.
- Decide what the format of the recorded wave should be (for example, 16-bit stereo wave with 44.1 KHz sampling rate). Click on Sequencer, then on Record To Wave, and then on Wave Format in the Orinj menu. You will get a dialog, where you can specify the desired format.
- Connect the MIDI output to the wave input with a sound cable.
- Click on Sequencer, then Record To Wave, and then Record in the Orinj menu. You will be prompted to save the wave file and recording will begin. Recording will stop either at the end of the MIDI file or when you press the stop button () in the player toolbar at the bottom Orinj.
When the recording stops, the recorded wave file will be displayed on screen in the Orinj single wave view.
Add new comment